Remote Serial Port: Difference between revisions
| Line 13: | Line 13: | ||
Now on to the PC part. Install the VPSE software from Eterlogic and start it. | |||
You will see a screen like this: | |||
[[Image:Vpse-step1.jpg]] | |||
Clicking on the "Create new device" button will get you here: | |||
[[Image:Vpse-step2.jpg]] | |||
Make sure you selected device type "Connector" in the drop-down and press "Next": | |||
[[Image:Vpse-step3.jpg]] | |||
Now select a (unused) COM port number which should be your new virtual COM port and press "Finish". | |||
''Make sure that the application you want to use to access this virtual port can open the COM port number you are about to create here. Older applications often only can be configured to use COM1-COM4, so creating COM9 could mean getting yourself into trouble.'' | |||
Verify that the virtual COM port you created (COM3 in the screenshot) is shown as "Ready": | |||
[[Image:Vpse-step4.jpg]] | |||
Next, press the "Create new device" button again and select "TcpClient" as device type: | |||
[[Image:Vpse-step5.jpg]] | |||
Press "Next". In the next screen you will have to enter the ip address of your RouterOS machine (192.168.1.254 in the screenshot) and the port number you configured above (10000 in our example). Also make sure that you select the virtual COM port we created just before in the "Source serial port" drop-down: | |||
[[Image:Vpse-step6.jpg]] | |||
Clicking on "Finish" will end our work and present you with a screen like this: | |||
[[Image:Vpse-step7.jpg]] | |||
If the status of your TCPClient device doesn't show "OK", you either have an error in your RouterOS config, or you cannot reach the configured port on the RouterOS machine from your PC (network cabling? routing? firewall? ...). | |||
If everything went well, you can now start any software and use our freshly created COM3 (in the example) to access your serial device connected to the RouterOS machine. Even if this would be located on another continent! | |||
==Common Problems== | ==Common Problems== | ||
* Authorizing your IP address does not alter any firewall rules in place on the device. If you have configured everything correctly and still cannot connect contact the mailing list for assistance. | * Authorizing your IP address does not alter any firewall rules in place on the device. If you have configured everything correctly and still cannot connect contact the mailing list for assistance. | ||
Revision as of 23:56, 12 April 2018
Some equipment that is co-located with HamWAN gear can be managed using remote serial ports. This page will assist you in establishing a connection to those devices.
Authorization
Accessing remote serial ports hosted on RouterOS devices requires you to authorize your IP address through our[portal.hamwan.ca portal]. To do this you will need a portal account.
- Locate the Equipment hosting the serial port you want to access and navigate to its Tools tab.
- Find the tool called Manage Remote Serial Port Access. If you cannot find this tool the device may not have remote serial ports enabled or your portal account might not have the correct permissions to authorize access to them.
- Click Query Statusto get a quick summary of authorizations already in place. (should be none)
- Before clicking Authorize IP ensure that the portal has correctly detected your IP Address or if you are authorizing an IP address different from the one you are accessing the portal with enter it in the text box.
- Click Query Status again to ensure that the authorization is in place.
Once you have completed whatever work requires access to the serial port please return to the portal and Reset Authorizations to ensure that all connections are closed and secure.
Computer Configuration
Our equipment is configured to expose a RFC2217 compliant remote serial port over TCP using port 5555. You should be able to use any compliant client software to connect but we will describe the process using VSPE from http://www.eterlogic.com/Products.VSPE.html
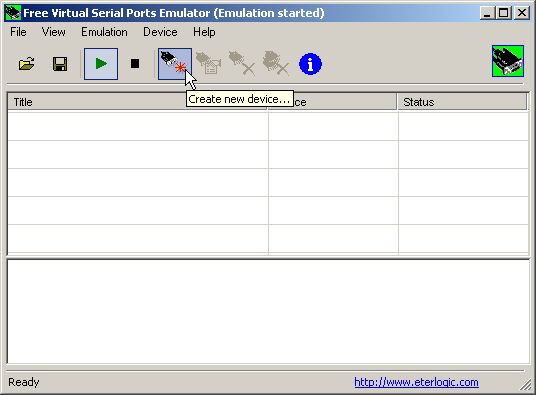
Now on to the PC part. Install the VPSE software from Eterlogic and start it.
You will see a screen like this:
Clicking on the "Create new device" button will get you here:
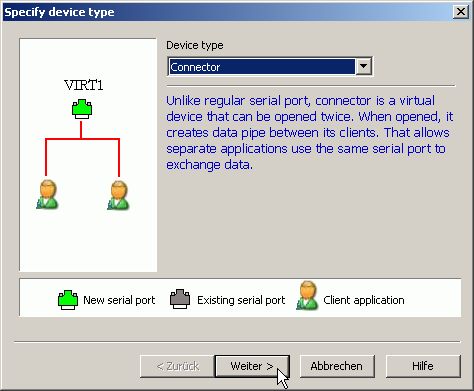
Make sure you selected device type "Connector" in the drop-down and press "Next":
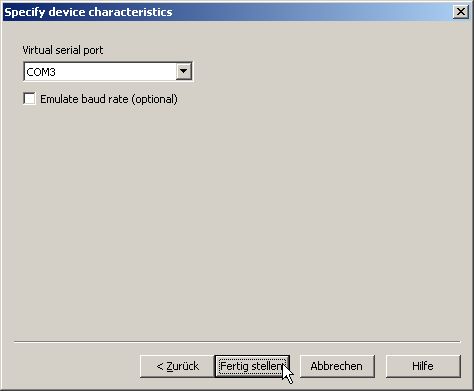
Now select a (unused) COM port number which should be your new virtual COM port and press "Finish".
Make sure that the application you want to use to access this virtual port can open the COM port number you are about to create here. Older applications often only can be configured to use COM1-COM4, so creating COM9 could mean getting yourself into trouble.
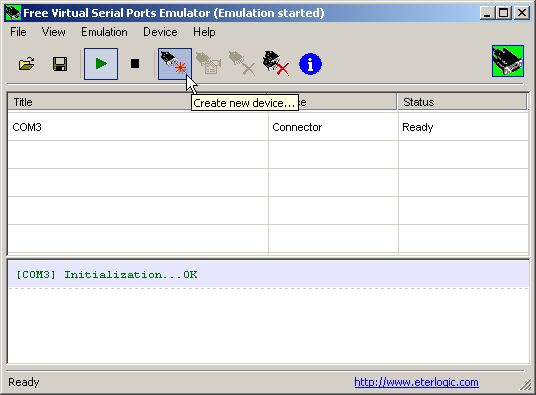
Verify that the virtual COM port you created (COM3 in the screenshot) is shown as "Ready":
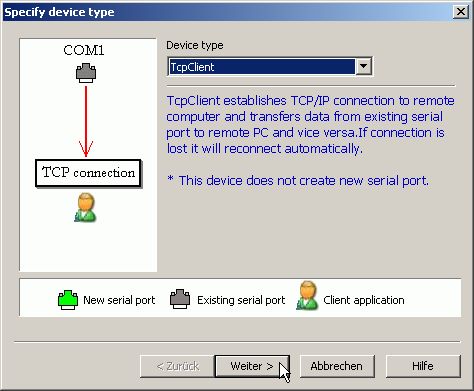
Next, press the "Create new device" button again and select "TcpClient" as device type:
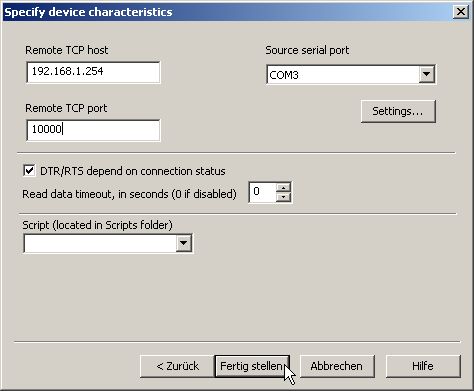
Press "Next". In the next screen you will have to enter the ip address of your RouterOS machine (192.168.1.254 in the screenshot) and the port number you configured above (10000 in our example). Also make sure that you select the virtual COM port we created just before in the "Source serial port" drop-down:
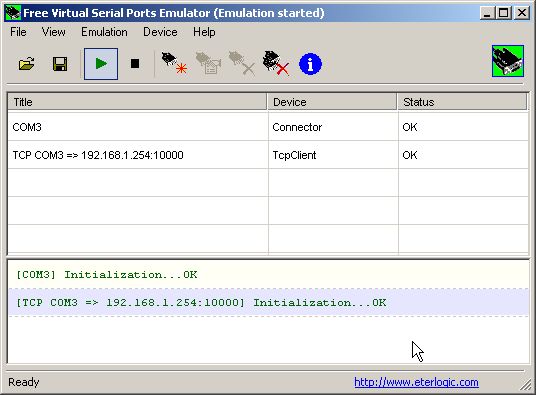
Clicking on "Finish" will end our work and present you with a screen like this:
If the status of your TCPClient device doesn't show "OK", you either have an error in your RouterOS config, or you cannot reach the configured port on the RouterOS machine from your PC (network cabling? routing? firewall? ...).
If everything went well, you can now start any software and use our freshly created COM3 (in the example) to access your serial device connected to the RouterOS machine. Even if this would be located on another continent!
Common Problems
- Authorizing your IP address does not alter any firewall rules in place on the device. If you have configured everything correctly and still cannot connect contact the mailing list for assistance.
